Street legal Motor scooters sold wholesale to the public.
ATV - FAQ
ATV Buyer's Guide
Did You Know?
Dealers sell almost half of all new ATVs to first-time buyers
More than 1,500 new units per day nationwide
Approximately 80% of the ATVs sold nationwide are utility-class machines
Older people are using ATVs to rediscover areas of the outdoors that had become inaccessible to them
15M Americans ride all-terrain vehicles
70% ride as a family recreation activity
Why are ATVs So Popular?
Extreme flexibility. ATVs are used for a variety of unique situations and jobs.
Easy to use. Like motorcycles, ATVs allow riders access to areas standard vehicles can't get to, or shouldn't. But unlike motorcycles, ATVs are easy to operate. Our automatic models do away with complicated gear shifting. This means they are easily accessible for people of all ages and disabilities. It also means you can spend more time on riding and enjoying yourself, and less time managing the vehicle.
For People of All Ages and Sizes. Not only are our vehicles easy to manage, but we have a wide range of sizes to accommodate a variety of users - young and old, small and tall.
Efficient and Cost-effective. As utility vehicles, ATVs have proven they are more efficient and cost-effective than their larger and more expensive counterparts. With access to a wide array of attachments, ATVs can be used to haul, spread and a variety of other applicable activities.
They're Fun! 70% of ATV riders use them for family recreation activity. It's a great way to get the family together, out in the country air, and active.
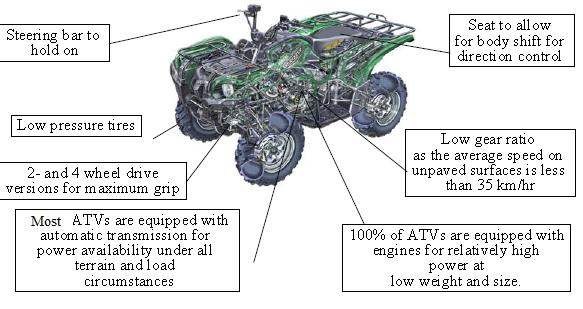
What is an ATV? An all-terrain vehicle (ATV), also known as a quad, quad bike, three-wheeler, or four-wheeler, is defined by the American National Standards Institute (ANSI) as a vehicle that travels on low-pressure tires, with a seat that is straddled by the operator, along with handlebars for steering control.
As the name implies, it is designed to handle a wider variety of terrain than most other vehicles. Although it is a street-legal vehicle in some countries, it is not street-legal within most states and provinces of Australia, the United States or Canada.
By the current ANSI definition, ATVs are intended for use by a single operator, although some companies have developed ATVs intended for use by the operator and one passenger. These ATVs are referred to as tandem ATVs.[1]
The rider sits on and operates these vehicles like a motorcycle, but the extra wheels give more stability at slower speeds. Although equipped with three or four wheels, six-wheel models exist for specialized applications. Engine sizes of ATVs currently for sale in the United States, (as of 2008 products), range from 49 to 1,000 cc (3 to 61 cu in).
https://en.wikipedia.org/wiki/All-terrain_vehicle back to top
What type of ENGINE do your ATV's have? All of our engines we offer in the models sold on this site are -4 STROKE- This means, there is no need to mix oil with fuel. In other words, the same fuel you put in your CAR is the same fuel you will put in our ATV's. back to top
What is the difference between 2 STROKE AND 4 STROKE? 2 Stroke have a higher low end output but require more serive and the oil you mix with the fuel acts as the lubricant for the engine. These engines usually last about 1/4 the life of a 4 STROKE. A Four Stroke engine has a higher TOP END and more torque. 4 Stroke engines do not require mixing of oil and gas becuase the engine has oil inside the engine for cooling. back to top
What is the SMALLEST ATV you offer? The SMALLEST ATV we carry is a 43cc 2 Stoke. This ATV can be located in the KIDS ATV section. back to top
What is the LARGEST ATV you offer? The LARGEST ATV we offer is a 500cc UTILITY 4X4 ATV. This ATV can be located in the UTILITY ATV's section. back to top
Where do you ship your ATV's from? We have WAREHOUSES located in CA, TX, GA, NY. When an order is placed with us, our staff goes to work finding the warehouse closest to you with your ATV in stock. back to top
How long does SHIPPING TAKE? SHIPPING GENERALLY TAKES 3-7 buisness days. During the busy seasons SHIPPING can take up to 9 business days to arrive. back to top
What kind of WARRANTY do you offer on your ATV's? ALL ATV's come with a 1 year powertrain warranty. Please check each ATV for the BUMPER TO BUMER coverage. Generally an ATV warranty will be 6 months with a 12 month powertrain. back to top
Do you offer EXTENDED WARRANTIES? Yes, we offer up to a 3 year warranty on all our ATV's. To locate this option please check on each ATV category for details. back to top
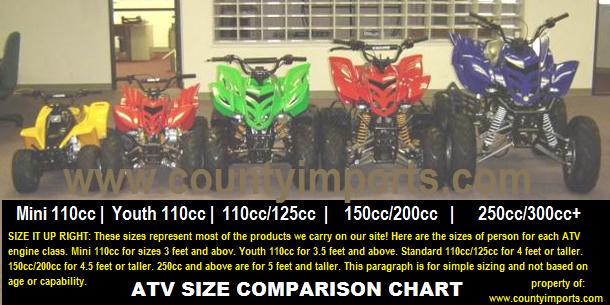
What AGES are your KIDS | CHILDRENS ATV's for? Our CHILDRENS ATV's are designed for kids between the ages of 6 and up. Please check each ATV for the size. You will find the L x W x H on each specs table. This will help you understand the size of the ATV in question. back to top
Do you carry PARTS for the ATV's you sell? ABSOLUTELY! Please feel free to browse our ATV Parts department. We carry over 60,000 parts in stock at all times. back to top
What kinds of GAS MILEAGE do ATV's get? This depends on the size of engine, rider and terrain. Generally a 49cc ATV will get 100+MPG, A 110cc ATV will get 90+ MPG. A 150cc ATV will get 70+ MPG. A 200cc ATV will get about 60+ MPG. A 400cc ATV will get about 50+ MPG and a 500cc ATV will get about 45+ MPG. back to top
How long will your ATV's last? With proper care, service and use, your new ATV will last for years to come. Our best estimate is 10+ years with proper care. Follow your ATV service manual for best results. back to top
Can you explain the assembly process? Assembling My ATVs
Note that not every ATV has the same assembly instruction, please feel free to give us a call if you need our technician assistance. Our brand ATVs usually come in steal crates wrapped in cardboard. They are very simple to assemble and come about 90% assembled from the factory. Here are a few steps to make sure that you properly assemble your ATV so that you and your kids can spend countless hours riding your favorite ATVs.
Examine your shipment
Before you accept the shipment you must make sure that your ATV has not been damaged during shipping. You should inspect the box for any tears or oil stain. Sometimes the shipping company may place heavy items on top of these ATV and bend the crate, which in turn may damage your ATV. If you suspect your ATV has been damaged during shipping you should make sure that the driver sign the damage on the bill of lading. It is important that you note the damage on the bill of lading as shipping companies only reimburse you or the shipper for the damaged incurred during shipping if the driver sign it before they hand the ATV to you. Here at Countyimports.com, we use only the best shipping companies to ship our products and inspects every shipment before it is sent out.
Now your ready for assembly
Removing The Crate
You will first need to disassemble the crate that has protected your ATV. First you will need to take off all of the cardboard that your ATVs was wrapped in. Then you will need to remove the bolts that keeps your ATV from moving around and get damaged. Once you have taken the bolts out, please have two peoples to lift the crate out.
Locating the battery, owners manual and bolts
The unit should come with a bag full of bolts, instructions, and a basic tool set. It is usually located either next to the ATV (On the foot rest) or underneath the seat (the seat has a latch in the back that you have to press to remove) there should also be a box with the battery in it. Some batteries are ready to go, but most others, you may have to put water solution that comes with it in a seperate container and charge up before you can use them.
Putting the front tires on
Once you have located everything you begin to put the wheels on. Depending on your ATV model, some ATVs comes with the rear wheels already attached, some not, and the ATV should be about 90% assembled. Make sure that the bolts on the rear tires are on there on tight in order for the wheels not to fall out during riding. Have someone help you lift the front of the ATV and attach the two front tires. Again make sure that the bolts are on tight and screwed in appropriately in order to prevent them from falling out. There should be a washer and a pin that will go on there. Twist the pin with pliers in order to secure the bolt on the tire. Check the tire pressure for the tires with a tire pressure gauge in order to make sure the tires have the appropriate amount of tire pressure; the tire pressure depends on the size of the tires, it should be listed on the side of the tires.
Attaching the handle bars
Located the handle bars and adjust them to the height appropriate for the rider. You will need to use the Allen wrench to tighten the Allen screws for the four-wheeler. If you do not have an Allen wrench or cant find it you will need to get a hold of one. Make sure that the handle bar height is the correct size for the rider. Depending on your unit you will need to attach the break lever and starter on one side and the thumb throttle on the other side. You can screw this on with a regular screwdriver. Again for safety make sure that they are adjusted appropriately for rider of the four-wheeler. Once you're done go over all of the screws and make sure they are on tight as sometimes vibration from the engine can cause loose screws.
Attaching the front bumper or front and rear racks (some models)
Depending on the your model you might need to attach the front bumper or the front and rear racks. Located the screws for them in the bag and attach them where the manual tells you to attach them. There are many models out there so it depends on what kind of model you have.
Connecting the battery
Now you will need to connect the battery. First make sure that the battery is charged. Some units come with a complimentary battery charger. Most of these ATVs operate with a 12 Volt seasonal battery if not charged regularly these batteries may need to be replaced every 3-4 months depending on use. Like I said earlier some batteries come with small liquid bottles for you to put in the battery. This is not battery acid, its simply a water and salt solution that will make the battery work. Locate the water solution pack open it and attach it to the battery until the liquid drains into the battery. Once you have made sure the battery is charged and ready to go you can now attach the battery. Make sure that you attach the positive post to the positive wire and the negative post to the negative wire. Put the battery into its compartment underneath the seat and screw on the terminals to the appropriate post. Attach the banana shaped seat it its place, the latch should click when you attach it and it should be pretty sturdy.
Your ATV is now Assembled
You are now done and ready to start up your ATV. Before you start up your ATV you might want to change the oil in it as many of them sit in the factory or warehouse for month before they are sold. Since they are mass-produced the factories sometimes use low-grade oil. Changing the oil before your first start can prevent many problems down the road. Once you have changed the oil you are ready to get your new ATV started. Enjoy your ATVs. back to top
ATVs are not "one size fits all." The ATV industry recommends all riders operate an ATV intended for their age. Youth model ATVs are designed for smaller hands and feet, and travel at slower speeds appropriate for their age.
The statutes of ATVEA define an ATV (All Terrain Vehicle) to mean "any motorized vehicle designed to travel on four low pressure tires on unpaved surfaces, having a seat designed to be straddled by the operator and handlebars for steering control.
ATVs are subdivided into two types as designed by the manufacturer:
Type I - A Type I ATV is intended for use by a single operator and no passenger Type II - A Type II ATV is intended for use by an operator and a passenger. It is equipped with a designated seating position behind the operator designed to be straddled by no more than one passenger
Some ATV manufacturers produce vehicles whose construction, while similar in apparence to ATVs as defined above, does not fall under the scope of ATVEA. ATVEA recognises and monitors developments in this area.
ATVs are used for both utility purposes such as in the agricultural and forestry sectors as well as for recreational
HISTORY OF THE ATV:
1967
American Honda asked Honda R&D Ltd. for new product dealers could sell when motorcycle sales cooled off in the winter.
1970
The Honda US90 was the world's first all-terrain vehicle (ATV). It sent its seven horsepower through a dual-range, four-speed gearbox with automatic clutch, and sold for $595. It was renamed the ATC90 later that year as Honda trademarked the ATC name.
1975
A fabric carcass was added to the original Honda ATC tires, and steel hubs replaced the first hubless tires to make them less vulnerable to punctures. Farmers were beginning to see the ATV as a tool to make their lives easier. An ATV uses 8% of the fuel necessary to feed a tractor.
1979
Yamaha introduces its first ATV, the YT125 Tri-Moto.
1980
Utility usage exploded in the 1980's and ATVs became multi-purpose machines, serving both recreational and utility purposes. This multi-purpose usage would continue to grow and increase from 30 percent of total usage in 1985 to approximately 80 percent in today's ATV market.
1981
Kawasaki introduces its first ATV model, the KTL200-A1, a three-wheeled model with a "dual-mode differential."
1982
Honda's ATC200E "Big Red®" had a 192cc engine and five-speed, dual range gearbox for chores such as towing, spraying, seeding and fertilizing. Its sealed rear brake survived muddy fields and water crossings, and telescopic-fork front suspension made a day in the saddle much more comfortable.
Suzuki introduces its first all-terrain vehicles, the 1983 ALT125D and ALT50D "Trail Buddy" 3-wheelers. Suzuki also introduces the first four-wheeled ATV, the LT125D featuring an odometer; five forward speeds plus reverse, an automatic clutch and a "Power Low Gear."
1983
The not-for-profit trade association Specialty Vehicle Institute of America (SVIA) was incorporated. Founding members were American Honda Motor Company, Kawasaki Motors Corp., U.S.A., American Suzuki Motor Corp., and Yamaha Motor Corp., U.S.A.
Yamaha introduces the YTM225DX Tri-Moto, the first shaft drive and electric start ATV.
Kawasaki introduces the "Duckster," a camouflaged three-wheeler aimed at the hunting market.
1984
Honda introduced its first 4-wheel ATV, the TRXTM 200. The 370,000 Honda units delivered in 1984 remain the high watermark for Honda sales, making up 69 percent of total ATV sales in the U.S. that year.
Yamaha introduces its first four-wheel ATV, the YMF400, and its first youth model, the YT60 Tri-Zinger.
1985
Honda introduced an all-new, liquid-cooled version of the 250R that produced 38 horsepower and offered nearly 10 inches of suspension travel at both ends.
Kawasaki introduces its first four-wheeler ATV, the Bayou 185.
Polaris enters into the ATV business.
1987
The major ATV manufacturers and the CPSC sign the preliminary Consent Decree.
Suzuki discontinues its 3-wheeled ATV products, but now has 11 four-wheeled models. The high performance LT500RH has a liquid-cooled two-stroke engine with automatic exhaust control, highly adjustable long-travel suspension, and triple hydraulic disc brakes.
Yamaha's high performance four-wheel Banshee 350 is the first twin cylinder ATV engine. As one of the industry's largest ATV two-stroke, it wins the Baja 1000 on the first try. The Big Bear 350 is the first Yamaha 4 x 4 ATV.
Kawasaki model line-up has grown from 2 models in 1981 to 8 in 1987. The Tecate 4 four-wheeler uses the KX motocross-based engine, and it is also the first year for the four-stroke Mojave 250 sport model.
1988
Honda opens first Rider Education Centers in Colton, California and Irving, Texas.
1989
Yamaha introduces the first ATV with a cargo bed, the Pro-Hauler.
Honda opens Rider Education Centers in Alpharetta, Georgia and Troy, Ohio.
1991
The first automatic Yamaha ATV is the Breeze.
1995
Arctic Cat joins the SVIA and begins production of its first ATVs.
1996
Arctic Cat begins to retail ATVs.
1997
The Prairie 400 4x4 is Kawasaki's first CVT (fully-automatic) equipped ATV and Kawasaki is the first Japanese company to offer a full-sized belt-drive model. This unit is honored as ATV Magazine's first "ATV of the Year."
Honda debuted its Electric Shift ProgramTM(ESPTM) on an all-new 450cc ATV, the Foreman ES.
1998
Honda introduced the advantages of its longitudinal power train to a broader circle of ATV users with the FourTrax ReconTM, a mid-size 2WD. Honda launches a nationwide public awareness campaign called "Ride Smart, Stupid Hurts."
Bombardier joins the SVIA and launches its first ATV model, the Bombardier Traxter.
1999
KTM Sportmotorcycles U.S.A., Inc. joins SVIA.
2000
The new Honda 2000 RancherTM combines the compact, powerful efficiency of the 329cc longitudinal-powered drive train in an all-new chassis. The Honda Rubicon is a liquid-cooled, overhead-valve, longitudinally mounted 500cc engine with an all new continuously variable Hondamatic transmission with enough original ideas inside to have more than 100 patents pending.
Cannondale joins the SVIA and unveils its first prototype ATV, the FX400.
2001
Toberlin, formerly AlphaSports Motors joins SVIA.
The Kawasaki Prairie 650 4x4 is the first (and only) V-Twin powered ATV on the market. It is the first to offer a completely sealed, oil-bathed multi-disk brake in the rear, and a rider-actuated front differential control.
The first FX400 ATVs roll off the Cannondale assembly line, and later in the year the Nac's/Cannondale ATV Racing Team is announced. Magazine reviews praise the Cannondale FX400 as "a thrilling addition to the sport quad market" and the "highest-tech quad ever developed." Cannondale's second ATV, the '02 Cannibal begins to ship to dealers. Cannondale plans to introduce three additional '02 ATVs, the Moto 440, Blaze 440 and Speed.
Arctic Cat is the first ATV manufacturer to produce ATVs for leading farm equipment manufacturer Massey Ferguson.
2002
Arctic Cat introduces the first fully independent suspension ATV (without a sway bar), and their first youth ATV, the Arctic Cat 90.
Bombardier supplies ATVs to the 2002 Salt Lake City Olympic Winter Games.
2003
John Deere joins SVIA
ATV sales in the United States reach nearly 900,000 units.
2004
Bush Hog joins SVIA.
Polaris Industries introduces, the Sportsman 700 Twin EFI is the world's first electronically fuel injected 4x4 ATV.
2005
Patriot joins SVIA.
BRP & Arctic Cat introduce the first Type II ATVs into the US market.
Polaris Industries joins SVIA.
2006
Yamaha introduces the first ATV with EPS (Electronic Power Steering), the Grizzly 700.
CountyImports.com offers our customer a PDI and assembley service. We can tell you however we a lot of experience at customer service, support after the sale giving our customers a real added value, period. But if you choose to assemble your ATV yourself, please go through to the instructionS below. Note that not every ATV has the same assembly instructions; please feel free to give us a call if you need our technician assistance. Our brand ATVs usually come in steal crates wrapped in cardboard. They are very simple to assemble and come about 90% assembled from the factory. Here are a few steps to make sure that you properly assemble your ATV so that you and your kids can spend countless hours riding your favorite ATVs. The video below is made by www.goeasyonline.com.au, for our customers in Australia we highly recommend them for service and any other motorsports needs that you may have.
Before you accept the shipment you must make sure that your ATV has not been damaged during shipping. You should inspect the box for any tears or oil stain. Sometimes the shipping company may place heavy items on top of these ATV and bend the crate, which in turn may damage your ATV. If you suspect your ATV has been damaged during shipping you should make sure that the driver sign the damage on the bill of lading. It is important that you note the damage on the bill of lading as shipping companies only reimburse you or the shipper for the damaged incurred during shipping if the driver sign it before they hand the ATV to you. Here at CountyImports.com, we use only the best shipping companies to ship our products and inspects every shipment before it is sent out.
Now you’re ready for assembly
Removing The Crate
You will first need to disassemble the crate that has protected your ATV.First you will need to take off all of the cardboard that your ATVswas wrapped in. Then you will need to remove the bolts that keeps your ATV from moving around and get damaged. Once you have taken the bolts out, please have two peoples to lift the crate out.
Locating the battery, owner’s manual and bolts
The unit should come with a bag full of bolts, instructions, and a basic tool set. It is usually located either next to the ATV (On the foot rest) or underneath the seat (the seat has a latch in the back that you have to press to remove) there should also be a box with the battery in it. Some batteries are ready to go, but most others, you may have to put water solution that comes with it in a separate container and charge up before you can use them.
Putting the front tires on
Once you have located everything you begin to put the wheels on. Depending on your ATV model, some ATVs comes with the rear wheels already attached, some not, and the ATV should be about 90% assembled. Make sure that the bolts on the rear tires are on there on tight in order for the wheels not to fall out during riding. Have someone help you lift the front of the ATV and attach the two front tires. Again make sure that the bolts are on tight and screwed in appropriately in order to prevent them from falling out. There should be a washer and a pin that will go on there. Twist the pin with pliers in order to secure the bolt on the tire. Check the tire pressure for the tires with a tire pressure gauge in order to make sure the tires have the appropriate amount of tire pressure; the tire pressure depends on the size of the tires, it should be listed on the side of the tires.
Attaching the handle bars
Located the handle bars and adjust them to the height appropriate for the rider. You will need to use the Allen wrench to tighten the Allen screws for the four-wheeler. If you do not have an Allen wrench or cant find it you will need to get a hold of one. Make sure that the handle bar height is the correct size for the rider. Depending on your unit you will need to attach the break lever and starter on one side and the thumb throttle on the other side. You can screw this on with a regular screwdriver. Again for safety make sure that they are adjusted appropriately for rider of the four-wheeler. Once you're done go over all of the screws and make sure they are on tight as sometimes vibration from the engine can cause loose screws.
Attaching the front bumper or front and rear racks / brush guard (some models)
Depending on the your model you might need to attach the front bumper or the front and rear racks. Located the screws for them in the bag and attach them where the manual tells you to attach them. There are many models out there so it depends on what kind of model you have.
Connecting the battery to your ATV
Now you will need to connect the battery. First make sure that the battery is charged. Some units come with a complimentary battery charger. Most of these ATVs operate with a 12 Volt seasonal battery if not charged regularly these batteries may need to be replaced every 3-4 months depending on use. Like I said earlier some batteries come with small liquid bottles for you to put in the battery. This is not battery acid, it’s simply a water and salt solution that will make the battery work. Locate the water solution pack open it and attach it to the battery until the liquid drains into the battery. Once you have made sure the battery is charged and ready to go you can now attach the battery. Make sure that you attach the positive post to the positive wire and the negative post to the negative wire. Put the battery into its compartment underneath the seat and screw on the terminals to the appropriate post. Attach the banana shaped seat it its place, the latch should click when you attach it and it should be pretty sturdy.
Your ATV is now Assembled
Before you start up your ATV you might want to change the oil in it as many of them sit in the factory or warehouse for month before they are sold. Since they are mass-produced the factories sometimes use low-grade "break in" oil. Changing the oil before your first start can prevent many problems down the road. Once you have changed the oil you are ready to get your new ATV started. Enjoy your ATVs.
¤~Deals on Wheels~¤
Register to instantly receive a discount code for 2% off any online purchase. Your code will appear here after submitting. You may need to scroll back to this point to receive code.